Before I get started, let me say this...there are so many different ways you can make a tufted headboard. The way I chose to make mine was based on what I had already at home. The only thing I went and bought were the tufting button kits and the foam padding mattress toppers for twin beds.
I had a twin headboard that was given to me that I used as a template for cutting out my design. Note, this is a full headboard that I made, not a twin. I had a piece of paneling left over from where I made the cabinet door for the office. I could have went and bought a piece of pegboard, but then that would be wasting.
After using the jigsaw to cut it out, I then found the middle and started measuring for my holes for tufting.
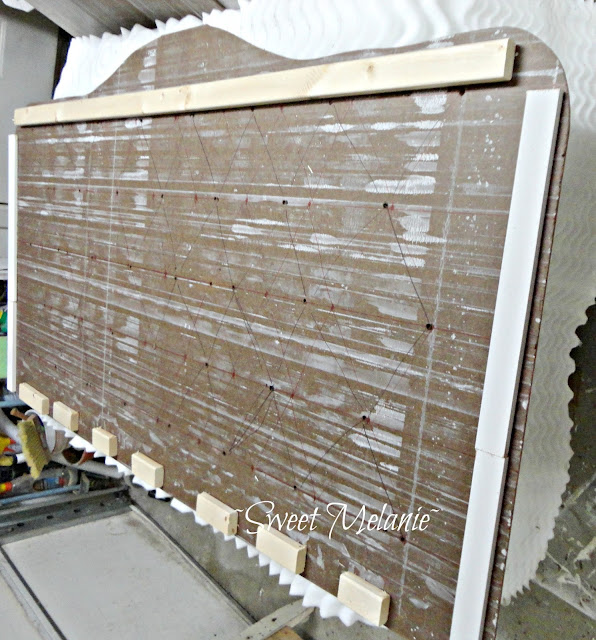
I used the box the bed frame came in to make my lines. I'm all about just using whatever instead of the proper tools. I measured 6 inches apart from top to bottom. Then 6 inches apart from side to side. Drawing my lines that way.
I marked a star at each point where I would be drilling the holes.
It made it easier for me to draw the diamonds to make sure I had it right....as you can see, I had to do it twice hence the black and red marker lines.
Then I drilled my holes.
I used some leftover firing strips for the back making sure it would bump out the headboard from the wall and also allowing me to attach it to the wall.
Then I started with the foam toppers. I bought two at $10 a piece...so much cheaper than buying foam and having it cut. I just stapled it to the back instead of the spray adhesive. Again, I'm all about using what I already have at home and saving money.
I bought a tufting kit with buttons at Walmart for $2.00 for 5 buttons in a package. Total buttons were 40 after all was said and done. I didn't take a photo of the kit, but it's super simple to use...no tools required to make them. It comes with everything you need other than fabric.
I had some fence wire so I got creative and used it instead of buying a long needle to thread the buttons through. It also replaced the waxed thread...killed two birds with one stone.
I took a pointy screwdriver and poked through the back at each hole all the way through to the front making sure I had the holes aligned properly and to be able to tuft the buttons.
I bent the wire and then stapled to keep from slipping after threading through the front at each hole..
I already had the fabric...make sure it is the length and width of your headboard unless you want a seam(I didn't). Any fabric will work.
And this is it all finished and hung. Normally people use a mitered strip of wood attached to the wall then attached to the matching mitered strip attached to the back of the headboard. I didn't....I used picture hooks and a piece of wire. I found my stud and added 2 nails to hang the headboard on. Perfect for when I get the urge to move my bed later on.
No big holes left in my wall!
No big holes left in my wall!


.JPG)
Wow, you are a girl with skills! :D Your headboard is amazing.
ReplyDeleteI am so impressed with this Melanie. It is beautiful. I know it is a lot of work but it really turned out so pretty. Job well done my friend. It looks so sweet in that room.
ReplyDeleteKris
It is so beautiful--so sweet of you to share how you did it!
ReplyDeleteMoving to wordpress this week and my hair is on fire... but I had to run by and tell you how GORGEOUS this is though, and that I pinned it and it went crazy :) Yay you!!
ReplyDelete