Friday, November 30, 2012

How to make a dining chair slipcover


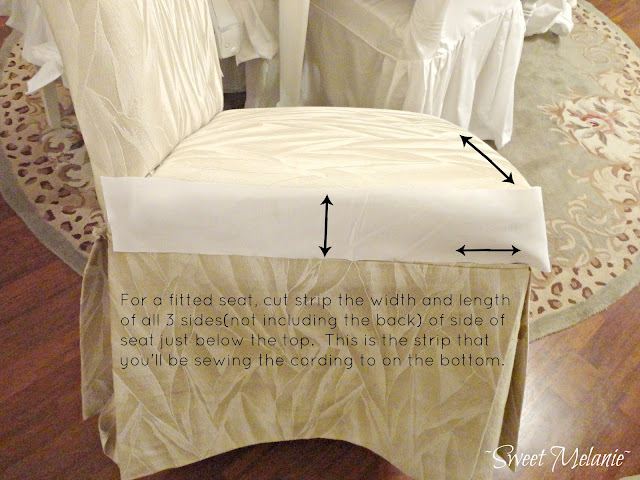
This is what the slipcover will look like when fitting.  It is easier to fit this way when it's inside out.


And this is the finished product...Hopefully!  I recommend studying photos and look up "How to make a slipcover" on youtube.  Ther are many to choose from that will suit your needs.  If you have a slipcover already, turn it inside out, study it, get a concept of how you'll be piecing it together.   You could even rip it all apart and use it as a pattern for different fabric if you aren't  using it anymore.   I've made many slipcovers through the years, so to me, this is easy...but it took some guts to finally start doing it instead of procrastinating about it.   I hope I haven't confused you any and I hope this will help a little.
 
Now go make a slipcover...no time like the present!


Sunday, November 25, 2012

Sweet Melanie's Mini Christmas Home Tour


Debbie from Debbiedoos has asked for a mini home tour...I am so very blessed to have met her on Rate My Space many years ago through HGTV.  She has been such an inspirational person and has helped me with my blog.  What would I have ever done without her and the many times on the phone walking me through each step....Thanks Debbie!!! 
 
So, here we go!


Welcome to our home for Chistmas in the mountains of West Virginia


Come on in....


One of our trees...done in whites, silvers and pale pinks. 


Our eat in kitchen is lively with lots of baking and laughter for the holidays...not a dull moment in this home.


All ready for the girls and their cookie decorating...


Our two girls....the best presents we could ever have!
 
 
One of our fireplace mantles....


The "little girls" room...


I made jar lights last year from some old jars that are truly vintage...my "Mammaw" had them when I was a little girl.  I am now 42....so there is the vintage for ya!


This is the back room all ready for Christmas presents for family members that we travel too.  It's nice to have them seperated.


And our master...
 
 
I hope you've enjoyed a little bit of our home for Christmas....  I'll be posting each room in the weeks to come. 
 
~Merry Christmas ~


Thursday, November 22, 2012

Romance for Christmas


Our little nest away from the worries of life...at least for a minute.


When I walk down the stairs, I feel overly blessed to have this space for my sweetie and I.  I have had so much fun doing it a little different in here compared to last year.  Too much furniture was really the culprit...


As I sat and gathered ideas, I had originally had this garland on the armoire...but it was just way too much.  So my little lightbulb went off!  The hubby loves it....and so do I!


Originally I bought a white tree years ago and have always put it here at the bottom of the stairs.  But I just didn't have the heart to move any furnitutre out and store for the holidays.  So my little trees got a makeover in whites, blues and silvers.


And I couldn't be happier!  The white tree turned out beautifully upstairs in a bedroom...so that will be another post.  Keep tuned, believe me there is a lot more to see.


Years ago, the sweetie and I made this fireplace for the wall mount gas stove.  I sure do wish there was an outlet here, I'd have it all lit up!


I still have fun decorating it though...and I love how the mirror reflects the light in this dark corner.


A few months ago, we moved this armoire from upstairs to down here.  I couldn't be any happier...and it just fits perfectly!


I found this little light up house at Home Goods...but can you believe I couldn't find the perfect spot for it anywhere?  Until now....


So there you have it...our little romantic get away for Christmas. 

Tuesday, November 13, 2012

~A Sweet Old door~


It all started with a door that my oldest daughter and I carried up from the garage one day.  I had purchased it on one of the many facebook yardsale sites that I follow for $20.  I had seen in a magazine a wall built from three old glass paned doors like this for an entry...so I knew I could do something with it.


As it leaned in the corner, my mind began to think...I have always hated that opening behind the door because it is short and is an awkward space.  Years ago, my sweetie and I had built the bi-fold doors for it so the girls could keep their backpacks and such.  But as I just said...it is an awkward space.  It gets a  little tight there sometimes with the main door, the armoire doors and the closet doors...always closing one to open the other.
 
So to the hardware store I went.  This is what I came up with...  I bought a dual door track for a glass sliding door.  Since the door would be hanging, I needed to make sure there was a little lip for the wheels to stay in.  Making sure the door did not fall forward. 
 
 
Then the work began...I ripped off the old molding and added the new wider molding.  (I now wat to replace all of our door molding with this stuff, but that'll have to be later!)  I want to mention...when cutting aluminum, you can do it with a jigsaw but always wear your safety glasses.  So much easier than with a hacksaw.  Then the sweetie installed the track inside the door jam with the rest hanging out to the right.
 
 
We added a 2x2 at the bottom of the door for added height.  Then installed the wheels. 


After installing the wheels on the inside of the door at the top for the track, I started painting.  Instead of adding fabric to the backside of the door, I thought of spraying the glass with the frost spray.  But I knew it would show shadows of all the junk in the closet.  I knew the fabric would get caught while sliding so I opted to paint the glass.  I've done it before so I knew it would work.  It lets the light come through and I think it works lovely with my Christmas decorations.  I might just leave the light on like a decoration itself!


It slides perfectly behind the armoire and the door knob acts as a good stopper. Now the space is more open...no more worries about all those DOORS!


Now I'm off to try and finish my Christmas decorations...that is if I don't think up another project.....

Thursday, November 8, 2012

Recovered Vintage Lampshade


I found a vintage lampshade at our local Flea Market some time ago...it sat in our storage room for at least a month.  The fabric that was on it was dry rotted so I ripped it all off and then recovered with some of the duvet fabric I had left. 


I bought some really cute eyelet lace and some gimp that I thought would really play it up without being to frilly and fou fou.


Years ago, I had bought a packaged light set from Lowes.  It came with this floor lamp.  I always hated the fact that you could see where it was linked together so I painted it a pale blue.  Now with the lampshade...I think it is perfect!


I love how soft the lighting is with the British Rose fabric and how it reflects in the glass of the china cabinet.


Along with the chair and the revamped gun cabinet...I think this area is just perfect!  It's funny how I am always redoing things, but I know you all have to do that too....

Thanks for visiting...now I'm off to recover some chandy shades and possibly do a little of my Christmas decorating.